The physical strike is the easy part. What determines a successful outcome is weight style selection before the hammer comes out, and balancer verification after the weight goes on. Skip either step and the installation isn't complete, regardless of how clean the strike looked.
This guide covers the full process — from identifying the correct clip series through post-install validation — for tire technicians and automotive service professionals working with a calibrated wheel balancer.
Key Takeaways
- Match the clip-on series to the rim flange profile using a gauge or application chart — don't guess by eye
- Use a rubber-tipped hammer only; metal hammers damage coatings and scratch the rim
- If a weight won't seat cleanly, it's the wrong series; bending or forcing the clip voids the fit
- Re-spin the wheel on the balancer after installation to confirm the balance is correct
- Rims without an accessible flange require adhesive weights, not clip-ons
Installation Guide for Clip-On Wheel Weights
The clip-on installation process has four phases: weight style identification, imbalance detection on the balancer, physical installation, and post-install validation. Each phase feeds directly into the next. Compressing or skipping any one of them doesn't save time — it creates the conditions for a callback.
Plan for 5–10 minutes per wheel when done correctly. Most of that time is weight selection and verification, not the strike itself.
Prerequisites and Safety Considerations
Before touching a weight, confirm three things:
- The wheel is mounted on a calibrated balancer. ISO 21940-21:2022 governs the performance requirements for balancing machines — using an out-of-spec machine produces unreliable readings that make the rest of the process meaningless.
- The rim flange is clean. Rust, debris, or old weight adhesive residue prevents the clip from seating flush. A wire brush or rag takes 30 seconds and prevents a misread fitment.
- The correct application chart or rim gauge is on hand. This is not optional equipment.
According to industry application guidelines, clip styles must match the specific wheel flange — the wrong clip profile on an alloy rim increases the likelihood of the weight falling off, and can cause visible surface scratching in the process. With alloy wheels on more than 80% of U.S. passenger cars, selecting the correct series for each rim type is a daily decision, not an edge case.
If the rim has no accessible flange, or if the wheel design doesn't allow the clip to seat flush, stop. Those applications require adhesive weights.
Tools and Parts Required
| Item | Notes |
|---|---|
| Calibrated wheel balancer | Required for imbalance detection and post-install validation |
| Rim gauge or application chart | Non-negotiable — visual guessing is the leading cause of wrong fitment |
| Soft-faced (rubber-tipped) wheel weight hammer | Standard metal hammers are not acceptable substitutes |
| Correct clip-on weights for the rim profile | Series must match the flange geometry specifically |
Clip-on weights come in lead, steel, and zinc — but lead is increasingly off the table. Nine U.S. states have passed laws banning lead wheel weights, including California, New York, Illinois, and Washington, with penalties up to $2,500 per day in some jurisdictions. Lead-free steel weights are the compliant, widely available alternative.
When sourcing in bulk, look for consistent dimensional tolerances and verifiable quality certifications. GUDE Corp manufactures ISO 9001-certified lead-free coated steel clip-on weights across six series (MC, P, T, AW, IAW, and FN), each engineered to specific rim flange profiles — which matters directly for clip fit consistency across production runs.
How to Install Clip-On Wheel Weights: Step-by-Step
Installation follows a defined sequence. The most common technician errors — and the ones that generate customer callbacks — come from compressing steps 1 and 6.
Step 1 — Identify the correct clip-on weight series
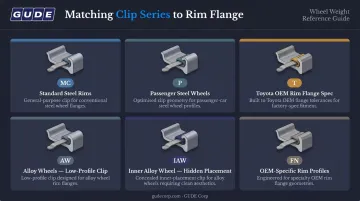
Use a rim gauge against the wheel flange, or reference the manufacturer's application chart. Multiple clip profiles exist, and none are interchangeable:
- MC Series — Standard steel wheel rim flanges, general automotive use
- P Series — Passenger car steel rim flanges
- T Series — Toyota and Lexus OEM rim flange specifications (manufactured by Toho Kogyo, Toyota's OEM supplier)
- AW Series — Alloy wheel rims, low-profile clip for minimal visibility
- IAW Series — Inner alloy wheel placement, hidden from view on premium vehicles
- FN Series — OEM-specific rim flange geometries, gram-based sizing (5g–60g)
Fitting the wrong series is the most common mistake in this process. It doesn't become obvious until the weight wobbles, scratches the rim, or detaches under load.
Step 2 — Detect the imbalance point
Mount the tire-wheel assembly on the balancer and run a balance check. Note both the imbalance location and the weight amount the machine indicates. Mark the position on the tire or rim if needed. Losing that reference point during installation means re-running the balance check.
Step 3 — Select and test-fit the weight
Choose the correct weight size per the balancer reading. Before striking, hold the weight against the rim flange at the imbalance point. A correct fit requires only a firm strike to fully seat. If it doesn't sit snugly without forcing, it's the wrong series. Don't proceed.
Step 4 — Strike and seat the clip
Position the weight clip on the flange at the marked location. Strike firmly with the soft-faced hammer in a single controlled motion. The soft face protects the weight's anti-corrosion coating — a damaged coating corrodes faster and can stain the rim surface over time.
Step 5 — Verify fitment
Check the clip from multiple angles. A correctly seated clip-on weight:
- Sits flush against the flange with no visible gap
- Does not rock when pressed by hand
- Cannot be shifted laterally without a removal tool
Any looseness means either the wrong series was used or the strike was incomplete.
Step 6 — Re-spin and validate
Remount the assembly on the balancer and run a second balance check. If the machine still shows imbalance, adjust weight placement or add correction before the wheel leaves the balancer. This step takes 60 seconds and is the only reliable confirmation the installation seated correctly.
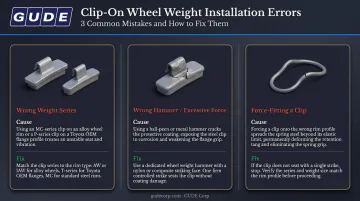
Common Installation Mistakes and How to Fix Them
The same installation errors show up repeatedly in shops: wrong weight series, wrong tool, or a technician trying to force a fit that isn't there. Each one has a specific cause and a direct correction.
Wrong Weight Style for the Rim Flange
The weight doesn't sit flush, wobbles after installation, or scratches the alloy rim surface. The root cause is series selection by eye — a technician eyeballing the flange instead of using a rim gauge or application chart. A mismatched clip won't seat correctly, and a weight that doesn't seat correctly won't stay on.
Remove the weight immediately. Use the rim gauge to confirm the correct series. Reinstall with the matched clip. If it didn't seat on the test-fit, it isn't the right weight for that rim.
Using the Wrong Hammer or Excessive Force
Chipped coating, a deformed clip, or a scratched rim all point to the same problem: a steel hammer or excessive force applied to a weight that wasn't seating cleanly. The U.S. Tire Manufacturers Association (USTMA) specifies soft-faced hammers because standard steel tools leave permanent marks and compromise the coating's corrosion resistance.
Replace any weight with damaged coating — a compromised coating accelerates corrosion and can stain the rim. If the rim is scratched, document it and inform the customer before returning the vehicle. Going forward: soft-faced hammer only.
Attempting to Force-Fit a Clip That Doesn't Seat
A technician using pliers or manually bending the clip to make an ill-fitting weight work has already selected the wrong series. The assumption that the clip can be adjusted to compensate is wrong — it cannot.
Discard the modified weight immediately. SAE J1986 outlines specific static retention force requirements for clip-on weights, and bending the clip with pliers destroys the engineered balance between the metal's elasticity and hardness. An altered clip will not hold under driving loads and can detach at highway speed. Select the correct series and reinstall.
Pro Tips for Installing Clip-On Wheel Weights Effectively
Keep a rim gauge at every balancing station. The seconds spent confirming the clip series before installation prevents the far greater time cost of a rim scratch, a misfit, or a customer return. Application charts from reputable manufacturers are updated as new rim profiles enter the market — make sure yours is current.
Protect weight coatings during storage. Store weights in a clean, dry environment. Avoid dropping trays. In high-humidity regions or areas with heavy road salt use, prioritize weights with durable corrosion-resistant coatings. Coating integrity determines whether a weight survives the tire's full service life or corrodes and stains the rim within a season.
Re-spin every time, without exception. Experienced technicians will tell you this is the step most commonly skipped under time pressure — and also the step most directly linked to vibration callbacks. Build it into the workflow as a non-negotiable. Industry data shows that over 70% of wheel balance comebacks trace back to procedure errors — the re-spin is the final defense against sending a problem out the door.
Know when to switch weight types entirely. If a rim has no accessible flange, features a low-profile design with insufficient clearance, or is a high-end alloy where clip marks are unacceptable, adhesive weights are the right call. Using the right weight type for the application matters as much as installing it correctly.
Frequently Asked Questions
Do wheel weights go on the inside or outside?
Placement depends on the wheel type and the balancer reading. Clip-on weights are installed where the clip can engage the rim flange — typically the outer edge on steel wheels. The IAW series is designed specifically for inner alloy wheel placement on premium vehicles, with the balancer determining the exact position.
What are the different styles of clip-on wheel weights?
Common styles include MC, P, T (Toyota OEM spec), AW (low-profile alloy), IAW (inner alloy, hidden placement), and FN (OEM-specific flange profiles). Each is engineered for a different rim flange geometry. A rim gauge or manufacturer's application chart identifies the correct style for each vehicle.
Can you reuse clip-on wheel weights after removing them?
Reuse is not recommended. Removing a clip-on weight stretches the spring steel past its elastic limit — the clip becomes "sprung" and loses its retention force. A reused clip is far more likely to shift around the flange or detach at speed.
What hammer should I use to install clip-on wheel weights?
A soft-faced or rubber-tipped wheel weight hammer is required. Standard metal hammers damage the weight's protective coating and risk scratching the rim, particularly on alloy wheels. A damaged coating shortens service life and can stain the rim surface.
How do I know if a clip-on weight is correctly seated after installation?
A correctly seated weight sits flush against the rim flange with no visible gaps, doesn't rock when pressed by hand, and cannot be shifted without a removal tool. Confirm with a re-spin on the balancer — an improved balance reading is the definitive indicator.
What happens if I use the wrong clip-on weight style for a rim?
A mismatched clip won't engage the flange properly and may appear seated while working loose under load, scratching alloy surfaces in the process. Remove it immediately, identify the correct series with a rim gauge, and reinstall.
The strike itself takes seconds. What determines whether the result holds at 70 mph three months later is everything around it: rim gauge check, test-fit, correct hammer, re-spin. Each step carries equal weight. For shops running high volume, clip fit consistency across inventory depends on dimensional tolerances and quality certification — factors that separate repeatable results from random ones.